After GSoC 2012 nomacs supports displaying HDR images and creating them from set of LDR images with different exposure.
You can find HDR version of nomacs here.
You can find HDR version of nomacs here.
HDR support will be added as a plugin to the first stable version of nomacs.
Three HDR image formats are supported: radiance HDR (.hdr, .pic), openEXR (.exr) and 32-bit or LogLuv tif (.tif).
Three HDR image formats are supported: radiance HDR (.hdr, .pic), openEXR (.exr) and 32-bit or LogLuv tif (.tif).
Tone mapping
When HDR image is loaded, tone mapping is applied to display the LDR version of the image.
To select tone mapping algorithm you can use edit->tone mapping->algorithm menu or go to tone mapping sections of nomacs settings, that provides more algorithms and allows you to changes their parameters.
To select tone mapping algorithm you can use edit->tone mapping->algorithm menu or go to tone mapping sections of nomacs settings, that provides more algorithms and allows you to changes their parameters.
Additional tone mapping parameters:
Downsample image to width: if image width is greater than this value, the image is resized.
Use it preview high resolution HDR images.
Apply gamma correction: applies gamma correction to the image after tone mapping.
Don't allocate extra memory: applies tone mapping to the hdr image in memory. Should be checked in most cases.
You can also apply tone mapping to LDR image, use edit->tone mapping->apply.
You can find list of all tone mapping techniques supported by nomacs by now it the bottom of the article, there is also a tool that allows you to compare multiple tone mapping algorithms.
Merging photos
If you want to create HDR image from a set of LDR images with different exposure values, go to edit->merge photos->make hdr.
There is also a tool called exposure fusion: it merges your photos into LDR image (thus no tone mapping is required) and does not need exposure values.
There is also a tool called exposure fusion: it merges your photos into LDR image (thus no tone mapping is required) and does not need exposure values.
Using HDR maker
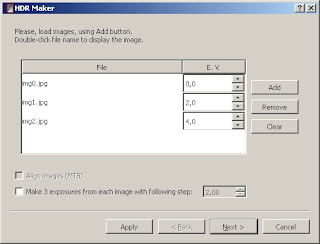
When you opened the HDR maker window, add some photos by using add button or by drag and dropping them into the white area.

You can double-click image name to preview it in nomacs window.
On the next page there are hdr making settings.
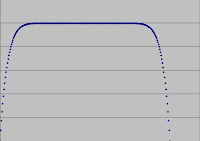
The weighting function is used to give greater weight to well-exposured pixels and to avoid over- or undersaturated ones.
Triangle function:

1-(2x-1)^12:

You camera may apply some corrections after making the photo, and we should revert those to get better results.
That's what responce curve option is for.
Linear curve leaves pixel values as they were:
Gamma curve applies inverse gamma correction, you are asked about the gamma value after choosing it:
The last option is to estimate the responce curve using Debevec's algorithm. The greater is the smoothness coefficient the smoother is the curve.
If you have a lookup table for your camera responce, you can load it using add button.
The file should have 256 lines with pixel value and inverse responce values for each of the channels, separated by tabs.
You can also save the curve, that was used to create HDR image and use it again next time.
When you have set all the options, click finish or apply.
Using exposure fusion
First add the photos, like when using HDR maker, only without exposure values.
There are only three parameters here, all in [0; 1] range, that set how different pixel properties influence it's overall weight.
Tone mapping algorithms and their parameters
1) Simple linear mapping, no parameters here.
2) Adaptive Logarithmic Mapping (Drago et al.)
This is fast and simple operator, that gives good results for most images wtihout any adjustments.
Parameters:
There is only one parameter, bias value (b in the article).
Range [0.7; 0.9] is the best choice, b = 0.85 works well for most images.
3) Photoreceptor mapping (Reinhard et al., 2005)
This is an operator based on how human vision system works.
Parameters:
Contrast parameter (m from the article). Range [0.3; 1.0], 0 for automatic estimation
Intensity parameter (f' from the article). [-8.0; 8.0], default value 1.
Color correction (chromatic adaptation, c from the article). Range: [0; 1].
If 0, adaptation is the same for all channels, if 1 they are treated independently.
Light adaptation (a from the article). [0; 1].
If 0, adaptation is based on global mean luminance, if 1, only on current pixel's value.
4) Bilateral filtering (Durand et al.)
Parameters:
Contrast: the ratio of the brightest pixel to the darkest one.
Bilateral filter parameters: sigma in luminance space and sigma in coordinate space.
5) Histogram mapping (global version of Duan et al. algorithm).
Brightness parameter. Range: [0; 1].
Proportion of linear and histogram mapping.
If 0, this is just linear mapping, if 1, it's purely histogram adjustment
6) Perceptual framework (Mantiuk et al., 2006) from pfstmo
Another algorithm based on human vision.
May take some time to work.
Parameters:
Contrast scaling factor. Range: [0; 1].
Saturation color desaturation. Range: [0; 1].
BiConjugate gradients: techical parameter, that allow you to choose biconjugate or conjugate gradients
7) Photographic tonemapping (Reinhard et al., 2002) from pfstmo
This algorithm imitates processes used to print photos.
Parameters:
Key value (average luminance will be mapped to it)
Sharpening parameter (1 for no sharpening)
Parameters:
Contrast scaling factor. Range: [0; 1].
Saturation color desaturation. Range: [0; 1].
BiConjugate gradients: techical parameter, that allow you to choose biconjugate or conjugate gradients
7) Photographic tonemapping (Reinhard et al., 2002) from pfstmo
This algorithm imitates processes used to print photos.
Parameters:
Key value (average luminance will be mapped to it)
Sharpening parameter (1 for no sharpening)
Use scales: if true, local tonemapping is used
Number of scales to use (refer to paper)
Number of scales to use (refer to paper)
Size of the largest scale
8) Gradient Domain Compression (Fattal et al.) from pfstmo
Not very fast.
Parameters:
Alfa - refer to the paper. Range: [0; 2]
Beta - refer to the paper. Range: [0; 2]
Gradient level of noise. Range: [0; 1]
Detail level. Range: [0; 1]
9) Display adaptive tone mapping (Mantiuk et al., 2008) from pfstmo
Parameters:
Your display type
Contrast enhancement: 1 preserves contrast, < 1 decreases, > 1 increases.
Saturation enhancement: 1 preserves saturation, < 1 saturation, > 1 saturation.
Some images
Original sequence:
Built-in tonemapping:
Tonemapping from pfstmo:
The same scene merged using exposure fusion:
Canal photos from hdrsoft.com
Tonemapping RAW image:
Images from nomacs gsoc puzzle
Tonemapping unsuccessful photo:
My photo


This comment has been removed by a blog administrator.
ReplyDeleteDoes this application do any de ghosting? Is it open source?
ReplyDelete